


You walk in and see he picture from his first birthday party. Everyone signed the photo mat. I don’t think I want to change this picture, even as he gets older.
 My mom made this little flag bunting using all the fabrics in the room:
 This little cubby is from Target and helps curb his massive book collection. The blue tubs holds recently loved books or the library books we have for the week.
 I don’t have a duvet or bedspread for him yet. He HATES covers and always yells if I try to cover him up. So my mom and I are trying to find the right inspiration to get one made in this next year, but it’s not pressing. He does sleep with a safety rail on his bed, but I took it off for this picture. :)
 Nothing huge in this picture, but I did rehang his nursery mobile above his bed and those are the simple “curtains” my mom made.
  We got all his furniture, the bed, dresser, and nightstand (which is just in his closet for right now) from Amazon.
  Above his dresser is a frame I found at a garage sale for $.25. I spray painted it orange. I’m going to hang a couple clothes pins in there and rotate out current art work he’s done.
 The book pockets are also made my my mom. I love that the books are at his height and he uses them a lot! There are usually more toys scattered on the floor as well, but it was clean for a short few days while he was gone. :) The little orange rug is originally from IKEA, but they don’t sell it anymore so I got it cheap on eBay.
 I put the pictures in sequential order, so it’s kind of like a short timeline of his life.
  And that’s it. It’s simple, yet I love the pops of orange.
 Then, tape off the stripe or stripes you want on your wall. We used a laser level to help get the lines straight.
 Then, here’s the trick. Go OVER the tape lines with your base color, in our case the tan color. Let this dry thoroughly. Why do this, you ask? Because this creates a seal with the tape. If any paint got under the tape, it’s the same as the wall color so it doesn’t matter.
 Then, paint your stripe! It took us 2 good coats of orange to get the coverage we needed.
 While the second coat is still DAMP, peel off the tape. This will prevent the tape from peeling up any paint.
 Enjoy your nice crisp line (or lines). Ignore the slight discoloration of the orange in this picture as the paint was still drying.

 Then I simply hammered a nail right through the paper where I had marked the hanger was. Then I ripped off the paper and hung the frame. No measuring needed!
 And ta-da. His pictures are finally hung!

 Welcome to Pinned It, Did It Monday where each week I try to actually do something I pinned on Pinterest. I’m trying to go back and use some of the first pins I stumbled across.
 So I cheated a little on this project. I pinned this and started it months ago. I knew the minute I saw it that I wanted these for above Ellie’s crib. But after doing the first 1.5 balls, I got bored with the project (have I ever blogged about my project ADD? More on that later). But seriously, doing 3 of these might have been a bit much. But knowing I needed something for these Monday posts made me finish these up this week and get them hung while Owen was away. I love how they turned out. That reminds me that I need to get you her nursery tour sometime, don’t I? Ok, onto the actual pin.
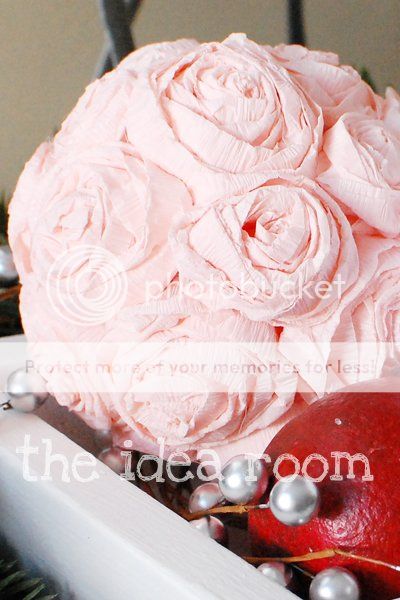


 My Review: I think they’re adorable. Flower balls made from styrofoam balls, streamers, and hot glue. She has pretty good directions on how to make these, including a video. Since I make lots of rolled flowers, they weren’t too hard to make, just a little tedious. But I’d be happy to give you more in-depth instructions if you need help! One thing I would suggest is painting your styrofoam balls the color of the streamers you’re using. That way if there are little spots that aren’t covered by a flower, it won’t matter. The other thing I’d suggest is buying more steamers that you think you’ll need. I ran out in the middle of ball #2 and even though I bought them all from Target, the streamers I bought later are a totally different color. Ok, maybe you wouldn’t notice, but I’m trying not to let it bother the perfectionist in mes. All in all, these make the perfect little “mobile” for above her crib.
 Who doesn’t love another chocolate chip recipe? I’m always on the lookout for a good one.
 My Review: I may have completely missed the part in the directions that the dough was supposed to sit in my fridge for 24 hours. Ooops. Didn’t follow that rule. Maybe that’s why my cookies look nothing like hers. But they were good! Very crunchy (again, could be me not the recipe) but I enjoy a good crunchy cookie. The little surprise in this one is the course salt you add. Every few bites I’d get a bite of the salt and I loved it. If you’re not a sweet/salty combo person, I’d leave the salt out. But overall, good cookies that were gone quickly. And I only made a half bath and that was plenty!